How to Build and Evaluate a 1D Convolutional Neural Network (CNN) Model for Multi-Class Classification Using Keras in Python?
Share
Condition for Building and Evaluating a 1D Convolutional Neural Network (CNN) Model for Multi-Class Classification Using Keras in Python.
Description: The code builds a 1D Convolutional Neural Network (CNN) for multi-class classification using Keras, trained on a dataset loaded from .npy files. It visualizes a sample of the data, splits it into training and testing sets, and defines a CNN architecture with convolutional, pooling, and fully connected layers. The model is trained, evaluated, and performance metrics like accuracy, F1 score, recall, and precision are reported.
Step-by-Step Process
Import Libraries: Import essential libraries like numpy, tensorflow, PIL, and sklearn for image processing and model building.
Load and Inspect Data: Load features (X) and labels (Y) from .npy files and visualize a few samples.
Preprocess Data: Split the dataset into training and testing sets using train_test_split.
Build and Train Model: Define a 1D CNN model using Conv1D and MaxPooling1D layers, followed by Dense layers for classification. Train the model for 10 epochs.
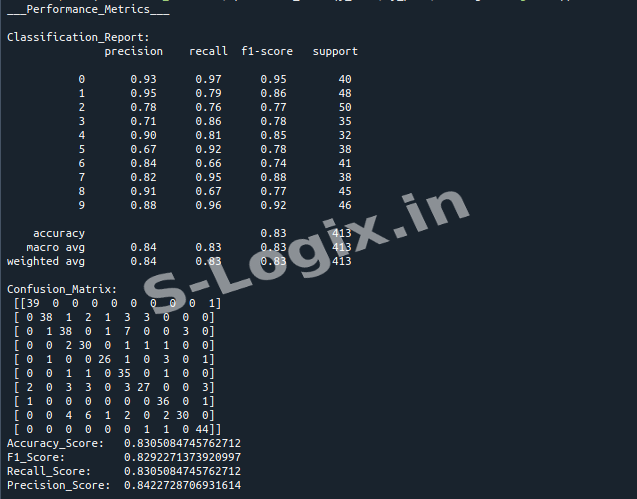
Evaluate and Visualize: Evaluate the model performance using accuracy, F1 score, recall, precision, and confusion matrix.
Sample Source Code
# Import Necessary Libraries
import numpy as np
import matplotlib.pyplot as plt
from sklearn.model_selection import train_test_split
import warnings
warnings.filterwarnings("ignore")
from tensorflow.keras.models import Model
from tensorflow.keras.layers import Flatten, Dense, Input, Conv1D, MaxPooling1D
from sklearn.metrics import (classification_report, confusion_matrix, accuracy_score, f1_score, recall_score, precision_score)
x = np.load("/home/soft12/Downloads/sample_dataset/Website/Dataset/archive (1)/X.npy")
y = np.load("/home/soft12/Downloads/sample_dataset/Website/Dataset/archive (1)/Y.npy")
# Visualize the Dataset
pos = [260,900,1800,1600,1400,2061,700,500,1111,100]
rows = 2
cols = 5
fig, axes = plt.subplots(rows, cols, figsize=(cols * 2, rows * 2))
axes = axes.flatten()
for i in range(10):
axes[i].imshow(x[pos[i]])
plt.show()
# Split the dataset into training and testing
X_train, X_test, y_train, y_test = train_test_split(x, y, test_size=.2, random_state=42)
def Conv1d_model(input_shape, num_classes):
# Input layer for 1D data
inputs = Input(shape=input_shape)
# Apply 1D Convolutional layers
x = Conv1D(64, 3, activation='relu')(inputs)
x = MaxPooling1D(2)(x)
x = Conv1D(128, 3, activation='relu')(x)
x = MaxPooling1D(2)(x)
# Flatten the output from Conv1D layers
x = Flatten()(x)
# Add fully connected layers
x = Dense(64, activation='relu')(x)
x = Dense(32, activation='relu')(x)
# Output layer with sigmoid activation for multi-class classification
outputs = Dense(num_classes, activation='sigmoid')(x)
model = Model(inputs=inputs, outputs=outputs)
model.compile(optimizer='adam', loss='categorical_crossentropy', metrics=['accuracy'])
return model
# Define input shape and number of classes
input_shape = (64, 64)
num_classes = 10
# Create and train the model
model = Conv1d_model(input_shape, num_classes)
model.summary()
history = model.fit(X_train, y_train, batch_size=16, epochs=10, validation_data=(X_test, y_test), verbose=1)
# Make predictions
y_pred = model.predict(X_test)
y_pred = [np.argmax(i) for i in y_pred]
y_test = [np.argmax(i) for i in y_test]
 Research Breakthrough Possible @S-Logix