List of Topics:
Location Research Breakthrough Possible @S-Logix pro@slogix.in

Office Address

Social List

How to Capture the Screen for a Certain Duration using Java?

Screen Capture in Java

Condition for Capturing the Screen for a Certain Duration in Java

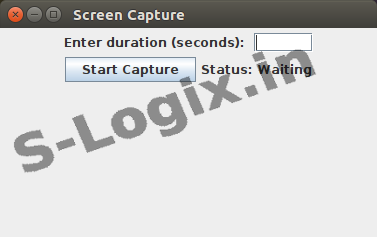
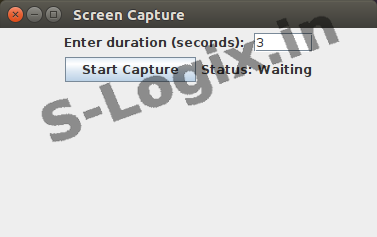
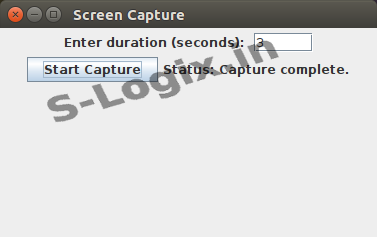
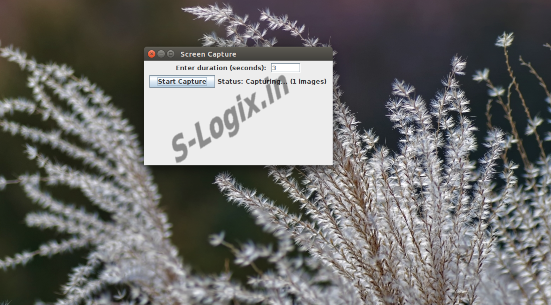
  • Description: To capture the screen for a certain duration in Java, the Robot class from the java.awt package can be used to take screenshots programmatically. First, create an instance of Robot, which allows capturing the screen using the createScreenCapture(Rectangle screenRect) method, where screenRect defines the area of the screen to capture. To capture the screen periodically, a loop can be used along with Thread.sleep() to wait for a specified interval between screenshots. Each screenshot is saved as an image file, such as PNG or JPEG, using ImageIO.write(). The loop continues for the desired duration by checking the elapsed time, and once the time limit is reached, the process stops. This approach can be enhanced by setting up a GUI or saving the screenshots to a specific location or format.
Sample Source Code
  • # ScreenCapture.java
    package JavaSamples2;

    import java.awt.*;
    import java.awt.event.*;
    import java.awt.image.BufferedImage;
    import java.io.File;
    import java.io.IOException;
    import javax.imageio.ImageIO;
    import javax.swing.*;

    public class ScreenCapture {

    private static int captureDuration = 0;
    private static boolean capturing = false;

    public static void main(String[] args) {
    JFrame frame = new JFrame("Screen Capture");
    frame.setDefaultCloseOperation(JFrame.EXIT_ON_CLOSE);
    frame.setSize(400, 200);
    frame.setLayout(new FlowLayout());

    JLabel label = new JLabel("Enter duration (seconds): ");
    frame.add(label);

    JTextField durationField = new JTextField(5);
    frame.add(durationField);

    JButton startButton = new JButton("Start Capture");
    frame.add(startButton);

    JLabel statusLabel = new JLabel("Status: Waiting");
    frame.add(statusLabel);

    startButton.addActionListener(new ActionListener() {
    @Override
    public void actionPerformed(ActionEvent e) {
    try {
    captureDuration = Integer.parseInt(durationField.getText()) * 1000;
    if (captureDuration <= 0) {
    statusLabel.setText("Status: Invalid duration");
    return;
    }

    if (!capturing) {
    new Thread(() -> {
    capturing = true;
    captureScreen(captureDuration, statusLabel);
    }).start();
    statusLabel.setText("Status: Capturing...");
    }
    } catch (NumberFormatException ex) {
    statusLabel.setText("Status: Invalid input");
    }
    }
    });

    frame.setVisible(true);

    }

    public static void captureScreen(int duration, JLabel statusLabel) {
    try {
    Robot robot = new Robot();
    Rectangle screenRect = new Rectangle(Toolkit.getDefaultToolkit().getScreenSize());
    long endTime = System.currentTimeMillis() + duration;
    int counter = 0;
    while (System.currentTimeMillis() < endTime) {
    BufferedImage screenshot = robot.createScreenCapture(screenRect);

    File outputFile = new File("screenshot_" + counter + ".png");
    ImageIO.write(screenshot, "PNG", outputFile);
    counter++;

    statusLabel.setText("Status: Capturing... (" + counter + " images)");

    Thread.sleep(1000);
    }

    statusLabel.setText("Status: Capture complete.");
    capturing = false;
    } catch (AWTException | IOException | InterruptedException e) {
    e.printStackTrace();
    statusLabel.setText("Status: Error during capture.");
    capturing = false;
    }
    }

    }
Screenshots
  • STEP 1: The user creates the GUI for capturing duration.
  • The user creates the GUI for capturing duration.

  • STEP 2: The user enters the duration for capturing the full screen.
  • The user enters the duration for capturing the full screen.

  • STEP 3: When the user selects the "Start Capture" button, the screen will be captured three times at specified intervals.
  • When the user selects the 'Start Capture' button, the screen will be captured three times at specified intervals.

  • image 1:
  • Screenshot 1

  • image 2:
  • Screenshot 2

  • image 3:
  • Screenshot 3

Related Links